Snap fit design is one of the most effective ways to reduce assembly costs and eliminate fasteners in injection molded parts. This guide covers snap fit types, design formulas, material selection, and best practices for achieving reliable snap fit performance.
Try the Snap-fit Calculator ↓
“Understanding why snap-fits fail starts with understanding how they work mechanically. The three-stage motion: Insertion, Deflection, and Recovery is where most design errors originate.”
The Mechanics of a Snap-fit: How It Works
Understanding a snap-fit is like understanding a well-timed gear shift.it’s all about the transition. Mechanically, a snap-fit works through a three-stage dance: Insertion, Deflection, and Recovery.

During assembly, the “male” part of the joint (the hook or bead) hits an interference that forces it to bend briefly. This is where physics gets tricky. Unlike a simple press-fit, a well-engineered snap-fit isn’t under constant stress once it’s locked. In a perfect world, your snap-fit sits in a stress-free state after the “click,” which is why they are so much better for long-term reliability than adhesives that can degrade over time. However, as we often see in the mold shop, the danger lies in the momentary load during that split-second deflection. Because the strain often exceeds the linear elastic range of the plastic, we must use the Secant Modulus for calculations rather than just the standard Young’s Modulus. If you miss this detail, your snap-fit might feel “mushy” or, worse, snap off during the very first assembly.
Get a Free DFM Review for Your Snap Fit Design
Not sure if your snap-fit geometry will hold up in real resin? Send us your CAD file and we’ll review your design for free checking wall thickness, deflection, and material fit before you commit to tooling.
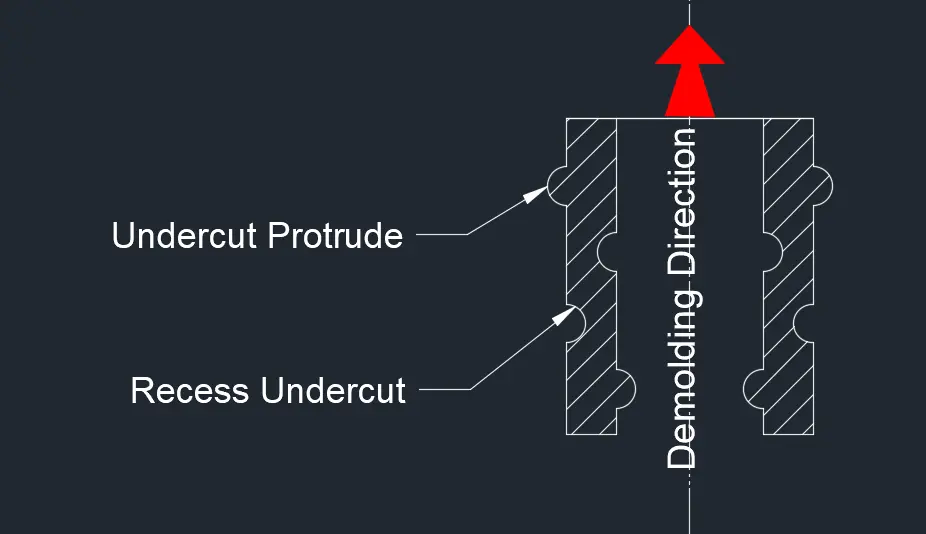
Classification of Snap-fit Joints: From Cantilever to Annular.
Snap-fits aren’t “one size fits all.” The geometry you choose dictates everything from the assembly feel to the long-term survival of the party. In my experience, most field failures happen because a designer picked a joint based on looks rather than the specific mechanical loads the plastic must endure during that split-second “snap.”
Cantilever Snaps:
If you’re working with thermoplastics, the cantilever snap is likely your go-to. It’s a simple beam and hook, but don’t let simplicity fool you.
- The Reality Check: During engagement, you’re dealing with pure flexural stress. That stress is a killer at the root of the beam.
- Pro Tip: I always tell my team: never use a uniform-thickness beam if you can avoid it. Go with a tapered design. By thinning the beam toward the tip, you distribute that stress much more evenly. It’s a simple change that can boost your permissible deflection by 60% without adding a penny to the part cost.

Annular Snaps:
When you’re dealing with cylindrical parts—think bottle caps, pen housings, or any axis-symmetrical geometry—annular is the way to go.
Mechanics: Instead of simple bending, you’re utilizing hoop stress. The entire circumference expands our contracts.
Design Tips: The “return angle” is your dial for permanence. If you want a cap that stays on forever, go with a 90° angle. If it needs to be reversible (like a high-end cosmetic lid), you’ll need to play with shallower angles to allow the bead to slide back out without sharing the plastic.

Torsion Snaps
Torsion snap-fits are a specialized design where the locking action depends on the twisting (torsion) of a pivot bar instead of the bending (flexion) seen in a standard cantilever beam. This change in how the plastic is loaded is a game changer for parts that need to be opened and closed repeatedly.

Stress Management: In a torsion snap, the force is converted into shear stress along a torsion shaft. Because shear stress is distributed more evenly across the material than the sharp tension at the base of a cantilever, these joints are far more resistant to fatigue and cracking.
The Rocker Arm Setup: This design usually works like a “rocker arm” on a fulcrum. When the user presses one end of the lever, it twists the torsion bar and lifts the latch at the other end. It’s an ideal setup for a secure, high-preload fit that stays easy to operate over time.
Best Applications: These are the standard choice for components that face thousands of cycles like battery doors on medical devices or industrial access panels. By separating the locking force from the bending stiffness of the material, you get a consistent, high-end “click” that doesn’t wear out after a few months of use.
Ball and Socket Snaps:
The ball and socket snap-fit is a sophisticated variation of the annular design, utilizing a hemispherical or spherical male component that interfaces with a corresponding female cavity. Unlike cantilever or torsion snaps, which are primarily intended for static fastening, the ball and socket is often designed as a functional kinematic joint.

Mechanical Integrity: This design provides a high degree of security against accidental detachment while allowing for multi-directional rotation or pivoting post-assembly. The engagement relies on a momentary radial expansion of the socket (hoop stress), requiring materials with high elastic recovery to maintain the integrity of the “snap.”
The Precision Challenge: Achieving the correct “feel” requires extremely tight tolerance control. If the interference is too high, the assembly force will exceed the material’s yield strength, causing permanent deformation. If too low, the joint will suffer from excessive “play” or vibration.
Engineering Application: These are the preferred solution for applications requiring adjustable positioning such as mirror housings, articulated linkages, or high-end consumer electronics. To ensure a “tight-but-smooth” operation, we often look at the coefficient of friction between the mating surfaces and may suggest specific resin grades (like lubricated POM) to prevent “stick-slip” behavior during rotation.
Critical Design Parameters and Formulas
Geometric Parameters for Cantilever Snaps


delta = Bending defl ection permissible
epsilon = Permissible strain percentage at the root of the beam
L = Length of the cantilever latch beam
H = Wall thickness at the root
B = Upper width at the root
A = Lower width at the root
c = Distance between outer fiber and neutral axis (center of gravity)
I = Axial moment of inertia
Z = Section modulus, Z = I / c
Es = Secant modulus of the material
F = Permissible defl ection force
W = Assembly force
Z2 = Annular modulus cross section
C1 = Annular concave cross section
C2 = Annular convex cross section
mu = Coefficient of friction
phi (inclination angle) = Angle of inclination
phi (annular) = Annular angle of concave width.
- In any snap-fit design, the maximum allowable deflection ($\delta$) isn’t just a number—it’s a balance between your part geometry and the strain limits of the specific resin you’ve chosen. If you push the plastic beyond its limit during assembly, you risk permanent deformation or a complete break.For unreinforced, semi-crystalline materials (like PP or Nylon), the rule of thumb is to stay within 70% of the yield strain. These materials have a more forgiving stress/strain curve, allowing them to handle the brief stress of the “snap” even when pushed close to their limit.However, for amorphous resins (like PC or ABS), we have to be much more conservative. Since these materials lack a well-defined yield point, we generally recommend using only 50% of the yield strain. Overlooking this difference is one of the most common reasons why ABS snap-fits crack during the first assembly trial.The permissible short-term strain values for several materials are:
- Acetal homopolymer 5%
- Nylon 6/6 unreinforced 6 to 10%
- Polycarbonate unreinforced 4%
- PC/ABS alloy 2.5%
- PET glass reinforced 1.7%
- PPO 4%
- PPO glass reinforced 1%
Once your snap-fit geometry is finalized, prototype injection molding is the most accurate way to validate fit and force. using the same resin as production.
Practical Design Guidelines for Snap Fits.
| Problem | Adjustment |
|---|---|
| Snap fit breaks easily | Increase L, reduce H, or switch to a tapered cross section |
| Assembly force too high | Same as above, or reduce the required deflection δ (adjust mating tolerances) |
| Retention force insufficient | Increase H or B, or switch to a higher flexural modulus material |
| Not enough space to increase L | Switch to a tapered cross section (coefficient 1.09 vs 0.67 — more efficient for the same footprint) |
Common Failure Modes of Snap-fit and How to Prevent Them
The most common failure we see is a clean snap at the base of a cantilever beam. Because plastics are highly notch-sensitive, any sharp internal corner acts as a stress propagator. Without a radius, the bending stress concentrates at a single point, leading to an immediate brittle fracture during the very first assembly.
The Fix: Never leave a sharp 90-degree angle at the root. Always include a generous fillet radius. Ideally, this should be between 25% to 50% of the beam’s thickness. This small geometric change distributes the bending stress across a larger area, significantly toughening the joint
Permanent Set from Over-Straining
If your snap feels “loose” or “mushy” after it’s been clicked into place, you’ve likely dealt with Permanent Set. This happens when the beam is deflected past its elastic limit, causing plastic deformation. The hook simply doesn’t have the “memory” to return to its original locking position.
The Fix: Move to a tapered beam design. By decreasing the thickness toward the tip, you distribute the strain uniformly along the entire length of the beam rather than just the base. This can increase your permissible deflection by over 60%. We also recommend designing “stops” or deflection limiters to prevent an operator (or end-user) from manually over-extending the beam during disassembly.
Creep and Stress Relaxation
Plastic isn’t completely rigid; it behaves a bit like a very stiff spring that slowly loses its “push.” If your design keeps the snap-fit under constant tension (a “preload”) to stay tight, it will eventually fail. Over time, the plastic relaxes, the tension disappears, and the joint becomes loose. This is why many plastic products start to rattle or squeak after a few months.
The Solution: Design the snap-fit so it reaches a stress-free state once it clicks into place. Instead of relying on the flexible snap to hold the weight or tension, use rigid “locators” (fixed posts or ribs) to handle the actual load. Let the snap-fit do only one job: acting as the lock to keep the parts from pulling apart.
Fatigue
For parts like battery covers that are opened repeatedly, you must worry about fatigue failure. Micro-cracks develop over time, eventually causing the part to fail at stress levels far below the material’s original yield point.
The Fix: If you expect frequent use, be conservative. Reduce your maximum allowable strain to roughly 60% of the single-use limit.
Manufacturing Defects
Even a perfect CAD model can’t save a poorly molded part. The biggest culprit here is the Weld Line (knit line). If the melt flow meets at the high-stress root of your snap, you’ve created a structural weak link. Furthermore, if the resin wasn’t dried properly, the resulting brittleness will make your snaps fail.
Conclusion:
Integrating snap-fits into your product is a smart move for both your assembly line and your bottom line. However, as we’ve discussed, the difference between a secure, satisfying “click” and a broken part often comes down to just a few tenths of a millimeter or the right radius at the base of a beam.
At Qlution Mold, we don’t just “cut steel” based on the CAD files we receive. We treat every project as a partnership. During our DFM (Design for Manufacturing) process, we look closely at your snap-fit geometries, checking for stress concentrations, material strain limits, and potential weld line issues before the mold even hits the CNC machine.Whether you are developing a high-cycle battery cover or a simple protective housing, our goal is to ensure that your design translates perfectly into a high-quality molded part. By catching these small engineering details early, we help you avoid costly mold modifications and assembly delays down the road.
Ready to optimize your next project? If you’re working on a design that utilizes snap-fit joints and want a second pair of expert eyes on the moldability, get in touch with us. Let’s make sure your product is built for performance from the very first shot.